Setting Up A Data Configuration File (Participant/Subject List)
Overview
C-PAC’s Configuration YAML Files
C-PAC requires at least one pipeline configuration file and one data configuration file (also known as the participant list/subject list) in order to run an analysis. These configuration files are in the YAML file format, which matches contents in a key: value relationship much like a dictionary. This section will focus on the data configuration file setup.
The Data Configuration (Participant List)
The data configuration file is essentially a list of file paths to anatomical and functional MRI scans keyed by their unique IDs, and listed with any additional information as necessary. This file can be generated by C-PAC through the terminal. This process is explained below.
UPDATE (May 15, 2018): C-PAC v1.1.0 and Later The data configuration file layout has changed significantly from older versions. Functional scan file paths, and scan parameter information (or scan parameter file paths) are now nested beneath the “func:” key. See the “Data Configuration File YAML Fields” section below for examples.
If you have already-existing data configuration files and wish to update these for the new version, you can simply use your already-existing data settings preset files to regenerate the data configuration files using C-PAC ≥v1.1.0. If you have any questions, please reach us on Neurostars.
From Terminal
Create data_settings.yml template file
You can configure the settings explained below in the data settings YAML file, then use the C-PAC command-line interface to generate your data configuration file.
If you don’t already have a data settings YAML file, you can generate one in your current directory by running:
cpac utils data-config new-settings-template
or:
singularity run C-PAC_latest.sif $BIDS_DIR $OUTPUTS_DIR cli -- utils data-config new-settings-template
or:
docker run -i --rm --user $(id -u):$(id -g) -v /path/to/data_config:/scratch -w="/scratch" fcpindi/c-pac:latest $BIDS_DIR $OUTPUTS_DIR cli -- utils data-config new-settings-template
If running a container directly (either of the latter options rather than the first option, which is through cpac (Python package)), bids_dir and outputs_dir are required but not used, so any non-null string will work for those positional arguments.
The Singularity command will create data_settings.yml in the current working directory you call the command from.
The Docker command requires a few more parameters than the Singularity command:
--user $(id -u)is necessary so the generated files will be owned locally by the user running Docker rather than byc-pac_user(the default).-v /path/to/data_config:/scratchbinds your localdata_configdirectory to/scratchon the Docker image, and-w="/scratch"sets the current working directory on the Docker image to/scratch.
Generate configuration files for individual-level and group-level analyses
Once you have a template, you can then configure the file as needed. You will need to use a text editor to fill in at least dataFormat, bidsBaseDir (if using BIDS data), outputSubjectListLocation, and subjectListName in your settings file before you build.
Once your data_settings.yml file is ready, you can generate your data configuration file by running the following commands, binding any directories in your data_settings.yml to the same locations in the container:
singularity run \
-B /path/to/bids_dir \
-B /path/to/outputs \
-B /path/to/data/in/data_settings/1 \
-B /path/to/data/in/data_settings/2 \
C-PAC_latest.sif /path/to/bids_dir /path/to/outputs cli -- utils \
data-config build /path/to/data_settings.yml
or:
docker run -i --rm --user $(id -u):$(id -g) \
-v /path/to/bids_dir:/path/to/bids_dir \
-v /path/to/outputs:/path/to/outputs \
-v /path/to/data/in/data_settings/1:/path/to/data/in/data_settings/1 \
-v /path/to/data/in/data_settings/2:/path/to/data/in/data_settings/2 \
-v /path/to/data_config:/scratch -w="/scratch" \
fcpindi/c-pac:latest /path/to/bids_dir /path/to/outputs cli -- utils \
data-config build /path/to/data_settings.yml
Continue below for some example use cases.
data_settings.yml contents
Data format - [BIDS, Custom]: Whether or not the data is organized in accordance with the BIDS specification. More details below.
BIDS Base Directory - [path]: The base directory of the BIDS-organized data, if you are using BIDS.
Anatomical File Path Template - [text]: If the data is NOT in BIDS format, you can provide a file path template describing the anatomical scans here. More details below.
Functional File Path Template - [text]: If the data is NOT in BIDS format, you can provide a file path template describing the functional scans here. More details below.
Save Config Files Here - [path]: The directory where you want the data configuration builder to save both the data settings file (these configured options) and the data configuration file (the list of input data to be provided to CPAC).
Participant List Name - [text]: The name/label for your data configuration and data settings files.
(Optional) Which Anatomical Scan? - [text]: Sometimes, there are multiple anatomical scans per participant in a dataset. To make life easier, you can tell the data configuration builder which anatomical scan to select for each participant by entering a sub-string here that can be found in the name or label of the anatomical scan you’d like to use for the run. Also, if you are using the Custom Anatomical File Path Template, you can enter a wildcard (*) in the path template in the anatomical scan file name, and the sub-string you enter here will determine which of the files returned by that wildcard is written into the data configuration.
(Optional) AWS Credentials File - [path]: Required if downloading data from a non-public S3 bucket on Amazon Web Services (AWS). This usually takes the form of a CSV file.
(Optional) Scan Parameters File - [path]: Path to a CSV file specifying the slice time acquisition parameters for scans. If set to ‘None’, these parameters will either be defined by the NifTI headers or by an explicit slice order specified in the pipeline configuration builder. Instructions for creating this CSV file can be found here. Note: If your data is in BIDS format, the data configuration builder will read the scan parameters described in the data’s affiliated JSON file(s), if they exist, and a scan parameters CSV file is not required.
(Optional) Brain Mask File Path Template - [text]: File Path Template for brain mask files. For anatomical skull-stripping. Note: use this for BIDS data directories as well, as the specification for anatomical brain masks is still subject to change. Place tags for the appropriate data directory levels with the tags {site}, {participant}, and {session}. Only {participant} is required. Example: /data/{site}/{participant}/{session}/{participant}_{session}_brain-mask.nii.gz
(Optional) Field Map Phase File Path Template - [text]: If you are running field map-based distortion correction, AND your data is not in BIDS format, provide the file path template to your phase files here. If your data is in BIDS format, the data configuration builder will find these files automatically.
(Optional) Field Map Magnitude File Path Template - [text]: If you are running field map-based distortion correction, AND your data is not in BIDS format, provide the file path template to your magnitude difference files here. If your data is in BIDS format, the data configuration builder will find these files automatically.
(Optional) Include: Subjects - [text/path]: List the participant IDs to include, to have only those participants included in the list. Either enter it here (ex. “1001, 1002, 1007, ..”), or enter the file path of a text file containing each participant ID on its own line.
(Optional) Exclude: Subjects - [text/path]: The same as above, except to exclude the participants you list here. Useful for when you only need a few dropped from the list of many.
(Optional) Include: Sites - [text/path]: Which sites to include - can be a list or a text file, as described above.
(Optional) Exclude: Sites - [text/path]: Which sites to exclude - can be a list or a text file, as described above.
(Optional) Include: Sessions - [text/path]: Which sessions to include - can be a list or a text file, as described above.
(Optional) Exclude: Sessions - [text/path]: Which sessions to exclude - can be a list or a text file, as described above.
(Optional) Include: Series - [text/path]: Which series to include - can be a list or a text file, as described above.
(Optional) Exclude: Series - [text/path]: Which series to exclude - can be a list or a text file, as described above.
Continue below for some example use cases.
Data: BIDS Format
A full description of the BIDS data organization specification can be found at bids.neuroimaging.io.
This is the simplest option. As the data is in BIDS format, the C-PAC data configuration builder will know where to find all of the input files, the scan parameters (if available), site information, and field map files (if applicable). The inclusion and exclusion options for the different data levels (participant, site, etc.) work as usual.
Using the cpac_data_config_setup.py script
In the data settings file, populate these fields:
dataFormat:                  'BIDS'
bidsBaseDir:                 /path/to/BIDS/directory
outputSubjectListLocation:   /save/configs/here
subjectListName:             data_config_name
brain_mask_template:         None
You can also fill in the AWS credentials file field, and the inclusion and exclusion fields, as needed.
Once your data settings file is ready, generate your data configuration file by running:
cpac utils data-config build /path/to/data_settings.yml
or:
singularity run C-PAC_latest.sif $BIDS_DIR $OUTPUTS_DIR cli -- utils data-config build /path/to/data_settings.yml
or:
docker run -i --rm --user $(id -u) -v /path/to/data_config:/scratch -w="/scratch" fcpindi/c-pac:latest $BIDS_DIR $OUTPUTS_DIR cli -- utils data-config build /path/to/data_settings.yml
Data: Custom Layout
The C-PAC Data Configuration builder can handle a wide range of different directory organization layouts, but can only do it seamlessly for you if all of your data is organized in that same layout. If you have input files arranged in different ways, simply generate two different data configuration files, and then manually add one to the end of the other, in a text editor.
Using the C-PAC command-line interface (CLI)
Your template paths should look something like this, for the corresponding directory layouts:
Actual file:     /home/data/site-01/sub1003/session-A1/anat/mprage.nii.gz
Template path:   /home/data/{site}/{participant}/{session}/anat/mprage.nii.gz

Actual file:     /home/data/site-03/sub-1005_session-B1/anat/anat.nii
Template path:   /home/data/{site}/{participant}_{session}/anat/anat.nii
Following the instructions for formatting your path templates given above, populate these fields in your data settings file:
dataFormat:                  ['Custom']
anatomicalTemplate:          /path/to/{site}/{participant}/{series}/anat/mprage.nii.gz
functionalTemplate:          /path/to/{site}/{participant}/{series}/func/{series}/bold.nii.gz
outputSubjectListLocation:   /save/configs/here
subjectListName:             data_config_name
You can also fill in the AWS credentials file field, and the inclusion and exclusion fields, as needed.
Once your data settings file is ready, generate your data configuration file by running:
cpac utils data-config build /path/to/data_settings.yml
or:
singularity run C-PAC_latest.sif $BIDS_DIR $OUTPUTS_DIR cli -- utils data-config build /path/to/data_settings.yml
or:
docker run -i --rm --user $(id -u) -v /path/to/data_config:/scratch -w="/scratch" fcpindi/c-pac:latest $BIDS_DIR $OUTPUTS_DIR cli -- utils data-config build /path/to/data_settings.yml
Custom Path Templates
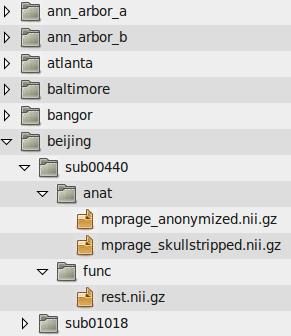
Here are the file path templates used for the 1000 Functional Connectomes data release, as well as an illustration of the directory structure used for the release:
Anatomical Template:  /path/to/data/{site}/{participant}/anat/mprage_anonymized.nii.gz
Functional Template:  /path/to/data/{site}/{participant}/func/rest.nii.gz

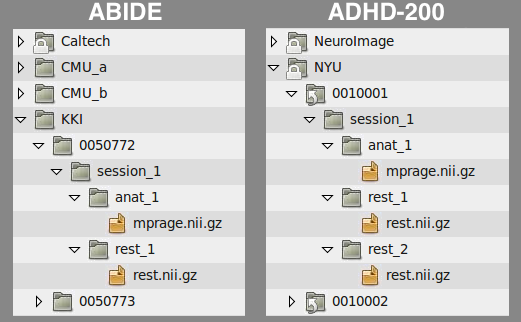
Another example is the file structure used by the ABIDE and ADHD-200 releases:
Anatomical Template:  /path/to/data/{site}/{participant}/{session}/anat_*/mprage.nii.gz
Functional Template:  /path/to/data/{site}/{participant}/{session}/rest_*/rest.nii.gz

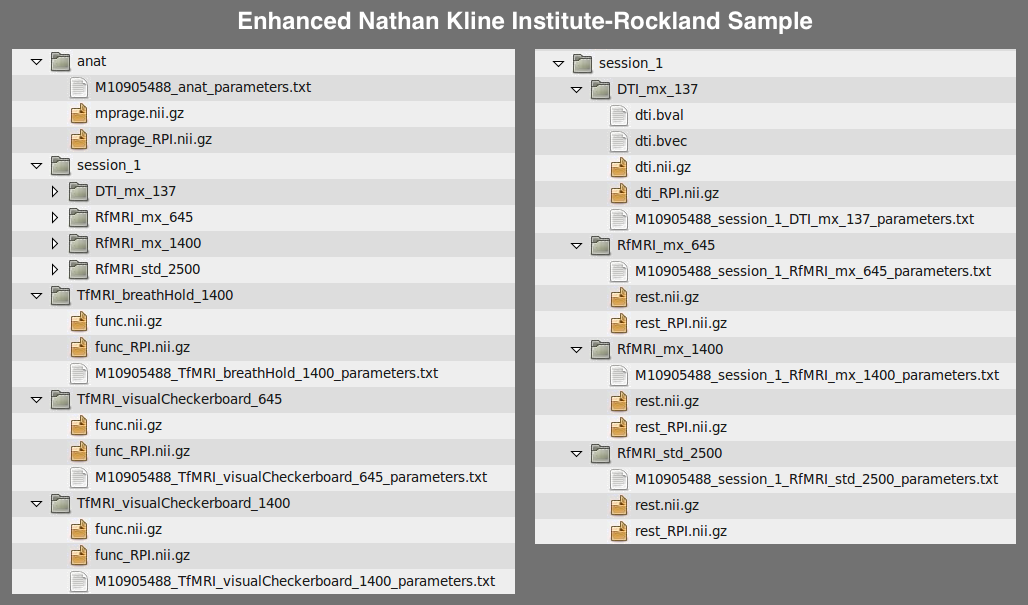
A final example is the file structure used by the Enhanced Nathan Kline Institute-Rockland Sample:
Anatomical Template:  /path/to/data/{site}/{participant}/anat/mprage.nii.gz
Functional Template:  /path/to/data/{site}/{participant}/{session}/RfMRI_*/rest.nii.gz

Users experiencing difficulties defining file path templates may want to re-organize their data to match one of the examples above. If you manually define a file path template and encounter an error when attempting to generate participant lists, please contact us and we will be happy to help.
Data YAML Fields
The cpac_data_config_setup.py command line utility will produce a YAML file containing all of the participants and various properties associated with that participant, such as its ID, session number, the location of its resting-state/functional and anatomical scans. Before each participant definition there is a single line with a dash, which indicates that start of the property definitions. Participant properties are indented under this dash. To illustrate, see the sample participant definition below:
# example of data stored locally
-
    subject_id: sub01
    unique_id: ses01
    anat: /path/to/site01/sub01/ses01/anatomical.nii.gz
    creds_path: None
    func:
      scan_1:
        scan: /path/to/site01/sub01/ses01/scan_1_func.nii.gz
        scan_parameters:
          acquisition: seq+z
          firsttr (start volume index): ''
          lasttr (final volume index): ''
          reference: 27
          tr: 3.0
    site: site01
-
    subject_id: sub02
    unique_id: ses02
    anat: /path/to/site01/sub02/ses02/anatomical.nii.gz
    creds_path: None
    func:
      scan_1:
        scan: /path/to/site01/sub02/ses02/scan_1_func.nii.gz
        scan_parameters: None
    site: site01

# example of data stored on an AWS S3 bucket
-
    subject_id: sub200
    unique_id: ses-1
    anat: s3://s3_bucket/path/to/site_A/sub200/anatomical.nii.gz
    creds_path: None (or) /path/to/AWS_credentials.csv
    func:
      scan_name_REST:
        scan: s3://s3_bucket/path/to/site_A/sub200/scan_name_REST_func.nii.gz
        scan_parameters: s3://s3_bucket/path/to/site_A/scan_name_REST_func.json
    site: site_A

# with a brain mask for brain extraction (bypassing skull-stripping)
-
    subject_id: sub02
    unique_id: ses02
    anat: /path/to/site01/sub02/ses02/anatomical.nii.gz
    brain_mask: /path/to/site01/sub02/ses02/brain-mask.nii.gz
    creds_path: None
    func:
      scan_1:
        scan: /path/to/site01/sub02/ses02/scan_1_func.nii.gz
        scan_parameters: None
    site: site01

# with field map files for distortion correction
-
    subject_id: sub01
    unique_id: ses01
    anat: /path/to/site01/sub01/ses01/anatomical.nii.gz
    creds_path: None
    func:
      scan_1:
        scan: /path/to/site01/sub01/ses01/scan_1_func.nii.gz
        fmap_phase: /path/to/site01/sub01/ses01/scan_1_phase-diff.nii.gz
        fmap_mag: /path/to/site01/sub01/ses01/scan_1_magnitude.nii.gz
    site: site01
Note that more than one functional scan is defined under the func key (i.e., multiple series), and that individual scan parameters can be defined to override the default settings.
Output Directory Ingress
New in version 1.8.6.
C-PAC now allows users to pull pre-computed data from a FreeSurfer or fMRIPrep output directory. This is done through the data config file.
# Example of how to include FreeSurfer outputs in the data config:
      anat:
        T1w: $PATH_TO/T1w.nii.gz
        freesurfer_dir: $PATH_TO/freesurfer/$SUBDIR/$SUBDIR
      func:
        func-run-1:
          scan: $PATH_TO/run-1_bold.nii.gz
          scan_parameters: $PATH_TO/run-1_bold.json
        func-run-2:
          scan: $PATH_TO/run-2_bold.nii.gz
          scan_parameters: $PATH_TO/run-2_bold.json
      site: $SITE
      subject_id: $SUB
      unique_id: $SES
When pulling fMRIPrep outputs into C-PAC, you only need to include a few sections of the data config, since no raw data is required.
# Example of how to include fMRIPrep outputs in the data config:
    site: $SITE
    subject_id: $SUB
    unique_id: $SES
    derivatives_dir: $PATH_TO/fMRIPrep/$SUBDIR/$SUBDIR
You may also need to modify your pipeline YAML. For FreeSurfer, please ensure that surface_analysis > freesurfer > ingress_reconall is switched on. For fMRIPrep, make sure that pipeline_setup > outdir_ingress is switched on.