Running C-PAC
Overview
As with configuring the subject list, pipeline configuration, and group analysis files, execute a C-PAC run by using C-PAC’s command line interface.
In addition to running C-PAC traditionally on your own local computer or on a server, there are three other avenues through which you can run C-PAC without going through the install process:
With a Docker or Singularity container (optionally with a simple Python commandline interface)
On the Amazon AWS Cloud
Through OpenNeuro
More details of these options are available below.
If you re-run C-PAC with an output directory containing a working directory (from the runtime flag --save_working_dir), C-PAC will use that working directories contents in the re-run. If you try to re-run on an output directory with a saved working directory from a different version of C-PAC than the one that you’re currently running, differences in the working directory could cause problems.
Note
C-PAC migrated from Python 2 to Python 3 in v1.6.2 (see release notes). If your working directory contains Python 2 pickles from an older version of C-PAC and you want to continue to use this working directory, run:
cpac utils repickle /path/to/working_dir
or:
docker run -i --rm --user $(id -u):$(id -g) -v /path/to/working_dir:/working fcpindi/c-pac:latest /bids_dir /outputs cli -- utils repickle /working
or:
singularity run C-PAC_latest.sif /bids_dir /outputs cli -- utils repickle /path/to/working_dir
before running C-PAC ≥ v1.6.2
See also
Common Issue: I’m re-running a pipeline, but I am receiving many crashes
cpac (Python package)
cpac is available so that you can easily run analyses without needing interact with the container platform that allows you to run C-PAC without installing all of the underlying software.
cpac requires Python 3.6 or greater. To get cpac, simply
pip install cpac
Download / Upgrade C-PAC with cpac
To download or upgrade a particular C-PAC image,
cpac pull
or
cpac upgrade
When downloading/upgrading, the --platform, --image, and --tag let you specify platform (Docker or Singularity), image (Docker image name or URL to image in repository), and tag (version tag, currently only for Docker repositories), respectively.
For example, a development Docker image can be downloaded with
cpac --platform docker --tag nightly pull
Or a Singularity image built from that Docker image can be downloaded with
cpac --platform singularity --tag nightly pull
Run C-PAC with cpac
To run C-PAC in participant mode for one participant, using a BIDS dataset stored on your machine or server and using the container image’s default pipeline configuration:
cpac run /Users/You/local_bids_data /Users/You/some_folder_for_outputs participant
By default, cpac (the wrapper) will try Docker first and fall back to Singularity if Docker fails. If both fail, an exception is raised.
You can specify a platform with the --platform docker or --platform singularity. If you specify a platform without specifying an image, these are the defaults, using the first successfully found image:
Usage
$ cpac --help

usage: cpac [-h] [--version] [-o OPT] [-B CUSTOM_BINDING]
            [--platform {docker,singularity}] [--image IMAGE] [--tag TAG]
            [--working_dir PATH] [-v] [-vv]
            {run,group,utils,pull,upgrade,crash} ...

cpac: a Python package that simplifies using C-PAC <http://fcp-indi.github.io> containerized images.

This commandline interface package is designed to minimize repetition.
As such, nearly all arguments are optional.

When launching a container, this package will try to bind any paths mentioned in
 • the command
 • the data configuration

An example minimal run command:
     cpac run /path/to/data /path/for/outputs

An example run command with optional arguments:
     cpac -B /path/to/data/configs:/configs \
             --image fcpindi/c-pac --tag latest \
             run /path/to/data /path/for/outputs \
             --data_config_file /configs/data_config.yml \
             --save_working_dir

Each command can take "--help" to provide additonal usage information, e.g.,

     cpac run --help

positional arguments:
  {run,group,utils,pull,upgrade,crash}

optional arguments:
  -h, --help            show this help message and exit
  --version             show program's version number and exit
  -o OPT, --container_option OPT
                        parameters and flags to pass through to Docker or Singularity

                        This flag can take multiple arguments so cannot be
                        the final argument before the command argument (i.e.,
                        run or any other command that does not start with - or --)
  -B CUSTOM_BINDING, --custom_binding CUSTOM_BINDING
                        directories to bind with a different path in
                        the container than the real path of the directory.
                        One or more pairs in the format:
                             real_path:container_path
                        (eg, /home/C-PAC/run5/outputs:/outputs).
                        Use absolute paths for both paths.

                        This flag can take multiple arguments so cannot be
                        the final argument before the command argument (i.e.,
                        run or any other command that does not start with - or --)
  --platform {docker,singularity}
                        If neither platform nor image is specified,
                        cpac will try Docker first, then try
                        Singularity if Docker fails.
  --image IMAGE         path to Singularity image file OR name of Docker image (eg, "fcpindi/c-pac").
                        Will attempt to pull from Singularity Hub or Docker Hub if not provided.
                        If image is specified but platform is not, platform is
                        assumed to be Singularity if image is a path or
                        Docker if image is an image name.
  --tag TAG             tag of the Docker image to use (eg, "latest" or "nightly").
  --working_dir PATH    working directory
  -v, --verbose         set loglevel to INFO
  -vv, --very-verbose   set loglevel to DEBUG
--platform docker
Look for
fcpindi/c-pac:latestlocally.Pull
fcpindi/c-pac:latestfrom Docker Hub.
--platform singularity
Look in the present working directory for any Singularity images. If more than one is found, use the most recently modified.
Pull
FCP-INDI/C-PACfrom Singularity Hub.Pull
fcpindi/c-pac:latestfrom Docker Hub and convert to a Singularity image.
You can also specify a container image with an --image argument, passing an image name (e.g., fcpindi/c-pac) for a Docker image or a filepath (e.g. ~/singularity_images/C-PAC.sif) for a Singularity image. You can also specify a --tag (e.g., latest or nightly).
You can also provide a link to an AWS S3 bucket containing a BIDS directory as the data source:
cpac run s3://fcp-indi/data/Projects/ADHD200/RawDataBIDS /Users/You/some_folder_for_outputs participant
In addition to the default pipeline, C-PAC comes packaged with a growing library of pre-configured pipelines that are ready to use. To run C-PAC with one of the pre-packaged pre-configured pipelines, simply invoke the --preconfig flag, shown below. See the full selection of pre-configured pipelines here.
cpac run /Users/You/local_bids_data /Users/You/some_folder_for_outputs --preconfig anat-only
To run C-PAC with a pipeline configuration file other than one of the pre-configured pipelines, assuming the configuration file is in the /Users/You/Documents directory:
cpac run /Users/You/local_bids_data /Users/You/some_folder_for_outputs participant --pipeline_file /Users/You/Documents/pipeline_config.yml
Finally, to run C-PAC with a specific data configuration file (instead of providing a BIDS data directory):
cpac run /Users/You/any_directory /Users/You/some_folder_for_outputs participant --data_config_file /Users/You/Documents/data_config.yml
Note: we are still providing the postionally-required bids_dir input parameter. However C-PAC will not look for data in this directory when you provide a data configuration YAML with the --data_config_file flag. Providing . or $PWD will simply pass the present working directory. In addition, if the dataset in your data configuration file is not in BIDS format, just make sure to add the --skip_bids_validator flag at the end of your command to bypass the BIDS validation process.
The full list of parameters and options that can be passed to C-PAC are shown below:
Usage: cpac run
$ cpac run --help

Loading 🐳 Docker
Loading 🐳 fcpindi/c-pac:latest with these directory bindings:
  local                         Docker                mode
  ----------------------------  --------------------  ------
  /home/circleci/build          /home/circleci/build  rw
  /home/circleci/build          /tmp                  rw
  /home/circleci/build/log      /logs                 rw
  /home/circleci/build/outputs  /output               rw
Logging messages will refer to the Docker paths.

usage: run.py [-h] [--pipeline_file PIPELINE_FILE] [--group_file GROUP_FILE]
              [--data_config_file DATA_CONFIG_FILE] [--preconfig PRECONFIG]
              [--aws_input_creds AWS_INPUT_CREDS]
              [--aws_output_creds AWS_OUTPUT_CREDS] [--n_cpus N_CPUS]
              [--mem_mb MEM_MB] [--mem_gb MEM_GB]
              [--num_ants_threads NUM_ANTS_THREADS]
              [--random_seed RANDOM_SEED]
              [--save_working_dir [SAVE_WORKING_DIR]] [--disable_file_logging]
              [--participant_label PARTICIPANT_LABEL [PARTICIPANT_LABEL ...]]
              [--participant_ndx PARTICIPANT_NDX] [--T1w_label T1W_LABEL]
              [--bold_label BOLD_LABEL [BOLD_LABEL ...]] [-v]
              [--bids_validator_config BIDS_VALIDATOR_CONFIG]
              [--skip_bids_validator] [--anat_only] [--tracking_opt-out]
              [--monitoring]
              bids_dir output_dir {participant,group,test_config,cli}

C-PAC Pipeline Runner

positional arguments:
  bids_dir              The directory with the input dataset formatted
                        according to the BIDS standard. Use the format
                        s3://bucket/path/to/bidsdir to read data directly from
                        an S3 bucket. This may require AWS S3 credentials
                        specified via the --aws_input_creds option.
  output_dir            The directory where the output files should be stored.
                        If you are running group level analysis this folder
                        should be prepopulated with the results of the
                        participant level analysis. Use the format
                        s3://bucket/path/to/bidsdir to write data directly to
                        an S3 bucket. This may require AWS S3 credentials
                        specified via the --aws_output_creds option.
  {participant,group,test_config,cli}
                        Level of the analysis that will be performed. Multiple
                        participant level analyses can be run independently
                        (in parallel) using the same output_dir. test_config
                        will run through the entire configuration process but
                        will not execute the pipeline.

optional arguments:
  -h, --help            show this help message and exit
  --pipeline_file PIPELINE_FILE
                        Path for the pipeline configuration file to use. Use
                        the format s3://bucket/path/to/pipeline_file to read
                        data directly from an S3 bucket. This may require AWS
                        S3 credentials specified via the --aws_input_creds
                        option.
  --group_file GROUP_FILE
                        Path for the group analysis configuration file to use.
                        Use the format s3://bucket/path/to/pipeline_file to
                        read data directly from an S3 bucket. This may require
                        AWS S3 credentials specified via the --aws_input_creds
                        option. The output directory needs to refer to the
                        output of a preprocessing individual pipeline.
  --data_config_file DATA_CONFIG_FILE
                        Yaml file containing the location of the data that is
                        to be processed. This file is not necessary if the
                        data in bids_dir is organized according to the BIDS
                        format. This enables support for legacy data
                        organization and cloud based storage. A bids_dir must
                        still be specified when using this option, but its
                        value will be ignored. Use the format
                        s3://bucket/path/to/data_config_file to read data
                        directly from an S3 bucket. This may require AWS S3
                        credentials specified via the --aws_input_creds
                        option.
  --preconfig PRECONFIG
                        Name of the pre-configured pipeline to run.
  --aws_input_creds AWS_INPUT_CREDS
                        Credentials for reading from S3. If not provided and
                        s3 paths are specified in the data config we will try
                        to access the bucket anonymously use the string "env"
                        to indicate that input credentials should read from
                        the environment. (E.g. when using AWS iam roles).
  --aws_output_creds AWS_OUTPUT_CREDS
                        Credentials for writing to S3. If not provided and s3
                        paths are specified in the output directory we will
                        try to access the bucket anonymously use the string
                        "env" to indicate that output credentials should read
                        from the environment. (E.g. when using AWS iam roles).
  --n_cpus N_CPUS       Number of execution resources per participant
                        available for the pipeline. This flag takes precidence
                        over max_cores_per_participant in the pipeline
                        configuration file.
  --mem_mb MEM_MB       Amount of RAM available per participant in megabytes.
                        Included for compatibility with BIDS-Apps standard,
                        but mem_gb is preferred. This flag takes precedence
                        over maximum_memory_per_participant in the pipeline
                        configuration file.
  --mem_gb MEM_GB       Amount of RAM available per participant in gigabytes.
                        If this is specified along with mem_mb, this flag will
                        take precedence. This flag also takes precedence over
                        maximum_memory_per_participant in the pipeline
                        configuration file.
  --num_ants_threads NUM_ANTS_THREADS
                        The number of cores to allocate to ANTS-based
                        anatomical registration per participant. Multiple
                        cores can greatly speed up this preprocessing step.
                        This number cannot be greater than the number of cores
                        per participant.
  --random_seed RANDOM_SEED
                        Random seed used to fix the state of execution. If
                        unset, each process uses its own default. If set, a
                        `random.log` file will be generated logging the random
                        state used by each process. If set to a positive
                        integer (up to 2147483647), that integer will be used
                        to seed each process. If set to 'random', a random
                        seed will be generated and recorded for each process.
  --save_working_dir [SAVE_WORKING_DIR]
                        Save the contents of the working directory.
  --disable_file_logging
                        Disable file logging, this is useful for clusters that
                        have disabled file locking.
  --participant_label PARTICIPANT_LABEL [PARTICIPANT_LABEL ...]
                        The label of the participant that should be analyzed.
                        The label corresponds to sub-<participant_label> from
                        the BIDS spec (so it does not include "sub-"). If this
                        parameter is not provided all participants should be
                        analyzed. Multiple participants can be specified with
                        a space separated list.
  --participant_ndx PARTICIPANT_NDX
                        The index of the participant that should be analyzed.
                        This corresponds to the index of the participant in
                        the data config file. This was added to make it easier
                        to accommodate SGE array jobs. Only a single
                        participant will be analyzed. Can be used with
                        participant label, in which case it is the index into
                        the list that follows the participant_label flag. Use
                        the value "-1" to indicate that the participant index
                        should be read from the AWS_BATCH_JOB_ARRAY_INDEX
                        environment variable.
  --T1w_label T1W_LABEL
                        C-PAC only runs one T1w per participant-session at a
                        time, at this time. Use this flag to specify any BIDS
                        entity (e.g., "acq-VNavNorm") or sequence of BIDS
                        entities (e.g., "acq-VNavNorm_run-1") to specify which
                        of multiple T1w files to use. Specify "--T1w_label
                        T1w" to choose the T1w file with the fewest BIDS
                        entities (i.e., the final option of [*_acq-
                        VNavNorm_T1w.nii.gz, *_acq-HCP_T1w.nii.gz,
                        *_T1w.nii.gz"]). C-PAC will choose the first T1w it
                        finds if the user does not provide this flag, or if
                        multiple T1w files match the --T1w_label provided. If
                        multiple T2w files are present and a comparable filter
                        is possible, T2w files will be filtered as well. If no
                        T2w files match this --T1w_label, T2w files will be
                        processed as if no --T1w_label were provided.
  --bold_label BOLD_LABEL [BOLD_LABEL ...]
                        To include a specified subset of available BOLD files,
                        use this flag to specify any BIDS entity (e.g., "task-
                        rest") or sequence of BIDS entities (e.g. "task-
                        rest_run-1"). To specify the bold file with the fewest
                        BIDS entities in the file name, specify "--bold_label
                        bold". Multiple `--bold_label`s can be specified with
                        a space-separated list. If multiple `--bold_label`s
                        are provided (e.g., "--bold_label task-rest_run-1
                        task-rest_run-2", each scan that includes all BIDS
                        entities specified in any of the provided
                        `--bold_label`s will be analyzed. If this parameter is
                        not provided all BOLD scans should be analyzed.
  -v, --version         show program's version number and exit
  --bids_validator_config BIDS_VALIDATOR_CONFIG
                        JSON file specifying configuration of bids-validator:
                        See https://github.com/bids-standard/bids-validator
                        for more info.
  --skip_bids_validator
                        Skips bids validation.
  --anat_only           run only the anatomical preprocessing
  --tracking_opt-out    Disable usage tracking. Only the number of
                        participants on the analysis is tracked.
  --monitoring          Enable monitoring server on port 8080. You need to
                        bind the port using the Docker flag "-p".
Usage: cpac utils
$ cpac utils --help

Loading 🐳 Docker
Loading 🐳 fcpindi/c-pac:latest with these directory bindings:
  local                         Docker                mode
  ----------------------------  --------------------  ------
  /home/circleci/build          /home/circleci/build  rw
  /home/circleci/build          /tmp                  rw
  /home/circleci/build/outputs  /output               rw
  /home/circleci/build/log      /logs                 rw
Logging messages will refer to the Docker paths.

Usage: run.py utils [OPTIONS] COMMAND [ARGS]...

Options:
  --help  Show this message and exit.

Commands:
  crash
  data_config
  group_config
  pipe_config
  repickle
  test
  tools
  workflows
Note that any of the optional arguments above will over-ride any pipeline settings in the default pipeline or in the pipeline configuration file you provide via the --pipeline_file parameter.
Further usage notes:
You can run only anatomical preprocessing easily, without modifying your data or pipeline configuration files, by providing the
--anat_onlyflag.As stated, the default behavior is to read data that is organized in the BIDS format. This includes data that is in Amazon AWS S3 by using the format
s3://<bucket_name>/<bids_dir>for thebids_dircommand line argument. Outputs can be written to S3 using the same format for theoutput_dir. Credentials for accessing these buckets can be specified on the command line (using--aws_input_credsor--aws_output_creds).When the app is run, a data configuration file is written to the working directory. This directory can be specified with
--working_diror the directory from which you runcpacwill be used. This file can be passed into subsequent runs, which avoids the overhead of re-parsing the BIDS input directory on each run (i.e. for cluster or cloud runs). These files can be generated without executing the C-PAC pipeline using thetest_runcommand line argument.The
participant_labelandparticipant_ndxarguments allow the user to specify which of the many datasets should be processed, which is useful when parallelizing the run of multiple participants.If you want to pass runtime options to your container plaform (Docker or Singularity), you can pass them with
-oor--container_options.
Footnotes
On the AWS Cloud
The C-PAC team has released an Amazon Marketplace AMI, making it easier for researchers to use C-PAC in the cloud. You can use the AMI to either launch a single machine for basic runs or create a high performance computing (HPC) cluster using Starcluster. Clusters can be dynamically scaled up as your computational needs increase. Detailed explanations of cloud computing and HPC are beyond the scope of this documentation, but we will define a few key terms before we start. If these terms are familiar, you may skip them and proceed to later sections.
Amazon Machine Instance (AMI) - A disk image of an operating system and any additional installed software that can be used to create a virtual machine.
Instance - A single running virtual machine whose initial state is based on the AMI that it is launched from. Instances can be classified as spot instances or on-demand instances. On-demand instances are reliably created the moment they are requested for a fixed rate. Spot instances are created based on whether or not a bid that you set is accepted by Amazon. They can be significantly cheaper than on-demand instances, but are only created when Amazon accepts your bid.
Instance Type - The hardware specification for a given instance. A list of the instance types made available by Amazon may be found here.
Terminated Instance - An instance is considered terminated when its resources have been completely freed up for use by others in the Amazon cloud. Any data on a terminated instance that is not relocated to persistent storage such as EBS (see below) will be completely discarded. Instance termination is the virtual equivalent of throwing out a physical server. When you have terminated an instance, you are no longer paying for it. Note that by default, instances do not have persistent storage attached to them- you will need to configure persistent storage when you set up the instance.
Stopped Instance - An instance is considered stopped when it is not active, but its resources are still available for future use whenever you choose to reactivate it. Stopping an instance is the virtual equivalent of turning a computer off or putting it in hibernate mode. When you stop an instance, you continue to pay for the storage associated with it (i.e., the main and other volumes attached to it), but not for the instance itself. You should stop an instance when the analyses you are working on are not fully done and you would like to preserve the current state of a running instance.
Simple Storage Service (S3) - A form of storage offered by Amazon. S3 is not intended to be directly attached to instances since it lacks a filesystem, but it can be used to archive large datasets. Amazon provides tools for uploading data to S3 ‘buckets’ where it can be stored. It is less costly than EBS.
Elastic Block Storage (EBS) - A form of persistent storage offered by Amazon for use with instances. When you have terminated an instance, items stored in an EBS volume can be accessed by any future instances that you start up.
EC2 Instance Store - A form of temporary storage that comes included with some instance types. Instance store volumes must be added manually before launching an instance, and all files stored on them will be lost when the instance is terminated. The instance store is typically mounted at
/mnt.
Lastly, it would be important to review any terms related to the Sun Grid Engine job scheduler.
Before you can create a single C-PAC machine or a C-PAC HPC cluster, you must first generate credentials that will allow you to log into any AWS instance that you create. The following steps will walk you through the process of creating all the necessary credentials and encryption keys that you will need.
Click the Sign in to the AWS Console button
Enter your e-mail address and password. If you do not already have an account, enter your e-mail address, select I am a new user. and click the Sign in button. Provide Amazon with the information (e-mail address, payment method) needed to create your account.
Amazon has different regions that it hosts its web services from (e.g. Oregon, Northern Virginia, Tokyo). In the upper right-hand corner there will be a region that you are logged into next to your user name. Change this to your preferred region. The Marketplace AMI is available in all regions, although public AMIs (non-Marketplace AMIs shared from personal accounts) may not be.
Click on your name in the upper right corner and navigate to Security Credentials. Accept the disclaimer that appears on the page.
Click on Access Keys and click on the blue Create New Access Key button. Click Download Key File and move the resulting csv file to a safe and memorable location on your hard drive.
Click on the box in the upper left corner of AWS. Click on EC2. Click on Key Pairs in the left-hand column.
Click on the blue Create Key Pair button. Give your key an appropriate name and click on the blue Create button. A .pem file will now save to disk. Move this file to a safe and memorable location on your hard drive.
On your local drive, open a terminal and run the following command:
chmod 400 /path/to/pem/file
Now that you have generated the access keys and a pem file, you may launch a single instance via Amazon’s web interface by following the steps below. If you are planning on processing many subjects or obtaining computationally-intensive derivatives (such as network centrality), you should use Starcluster instead.
In the left-hand column under the INSTANCES header in the AWS console, click Instances. This is a dashboard of all instances you currently have running in the AWS cloud. Click the blue Launch Instance button.
On the left-hand side of the new page, click on the Amazon Marketplace tab and search c-pac in the search text box.
Click the blue Select button next to the C-PAC AMI. Click the blue Continue button on the next screen.
Now choose the instance type that you would like to use. Note that C-PAC requires at least 8 GB of RAM- the m3.xlarge instance type has 15 GB of RAM and 4 CPUs and functions well with C-PAC for small runs and experimentation. This instance type is equivalent to a standard desktop machine in terms of processing power. To select this type, click on the General purpose tab and click the box next to m3.xlarge. Then, click the Next: Configure Instance Details button. Note that for most larger runs you will want to choose a more powerful instance type, such as c3.4xlarge or c3.8xlarge.
The details page can be used to request spot instances, as well as other functionality (including VPN, VPC options). For a basic run you do not need to change anything, although you can tailor it according to your future needs. Hovering over the ‘i’ icons on this page will give you more insight into the options available. When done, click Next: Add Storage.
On the storage page, you can allocate space for the workstation, such as user and system directories. This is where you can attach instance store volumes if your instance type comes with them. To do this, click the Add New Volume button and select the instance store via the dropdown menu in the Type column. You may need to do this multiple times if your instance comes with multiple instance stores. If you want the files stored on the root volume to be kept after the instance is terminated, uncheck the box below the Delete on Termination column. Note that persistent storage for the datasets can be allocated and attached as described in a later section. Click Next: Tag Instance.
On this page you can tag the instance with metadata (e.g., details related to the specific purpose for the instance). Tags are key-value pairs, so any contextual data that can be encapsulated in this format can be saved. Click Next: Configure Security Group.
On this page, you can modify who has access to the instance. The AMI defaults allow remote access from anywhere. If you would like to customize security to allow only a certain set of IP addresses and users access to the instance, you can do so here. If you find that custom settings, such as using the My IP setting or specifying a range of IP addresses, do not work, consult with your institution’s network administrator to make sure that you are entering settings correctly. Click Review and Launch when you are done.
This final page summarizes the instance details you are about to launch. You might receive some warnings as a result of security or the instance type not being in the free tier. These warnings can be ignored.
Click the Launch button. A dialogue box will ask you to choose a key pair for the instance. Every instance requires a key pair in order for you to securely log in and use it. Change the top drop down menu bar to Choose an existing key pair and select the key pair you created in the Creating AWS Access and Network Keys section in the other drop down menu. Check the acknowledgement check box and click the blue Launch Instances button.
You can click the View Instances blue button on the lower right of the page after to watch your new instance start up in the instance console.
When the Instance State column reads running and the Status Checks column reads 2/2, the instance should be active. Click on the row for the new instance. In the bottom pane, take note of the values for the Instance ID, Public DNS, and Availability zone fields under the Description tab.
Once your instance is up and running, you can create a persistent storage volume for your data and results. In the left-hand column under the ELASTIC BLOCK STORE header in the AWS console, click Volumes. This is a dashboard of all volumes that you currently have stored in EBS. Click the blue Create Volume button.
Change the size field in the proceeding dialogue to have enough space to encompass the amount of data you expect to store. A single volume can be as small as 1 GB or as large as 16 TB. Change the availability zone to match the zone from your instance’s Description tab.
Click the checkbox next to the newly-created volume. Click Actions followed by Attach Volumes. Enter the Instance ID from the instance’s Description tab in the Instance field. The Device field should fill itself automatically and should be of the form /dev/sdb or similar. Note the letter used after the sd. Click the blue Attach button.
Execute the following command from the terminal to make it so that your instance can see the volume (replace the letter b at the end of /dev/xvdb with the letter from the previous step).
ssh -i /path/to/pem/file ubuntu@<Public Domain Name> 'sudo mkfs -t ext4 /dev/xvdb && sudo mount /dev/xvdb /media/ebs
To use this volume with future instances, you may attach it to the instance using the AWS console and then use this command:
ssh -i /path/to/pem/file ubuntu@<Public Domain Name> 'sudo mount /dev/xvdb /media/ebs'
Note that the creation of a persistent volume is heavily automated in Starcluster, so if you will be creating many different persistent volumes you should use Starcluster instead.
There are now two different means of accessing the instance. Either through X2Go (a desktop GUI-based session) or through ssh (a command line session).
Open a terminal and type
ssh -i /path/to/pem/file ubuntu@<Public Domain Name>.Type yes when asked if you trust the source.
Install the X2Go client using the instructions here.
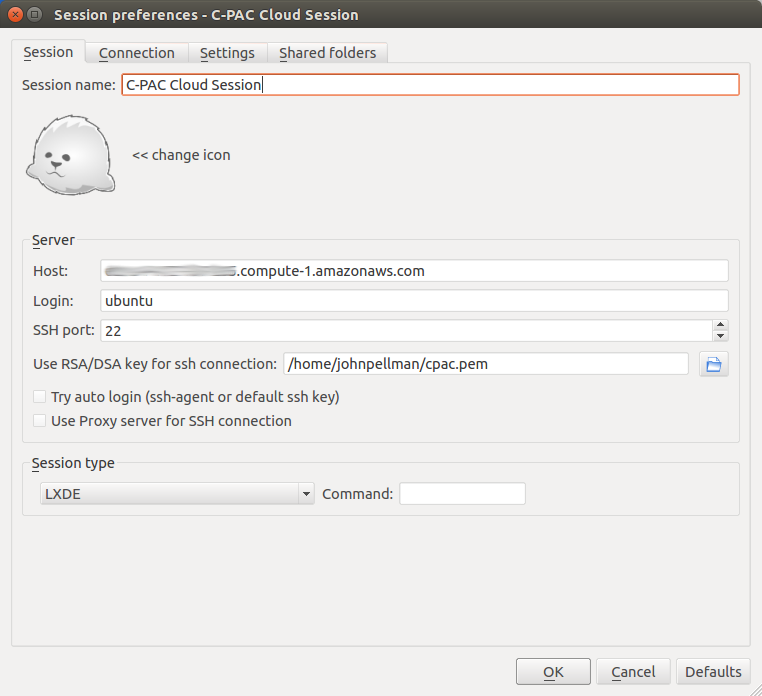
Open X2go and create a new session.
For Host:, enter the Public DNS from earlier.
For Login: enter ubuntu.
SSH port: should be 22.
For Use RSA/DSA key for ssh connection:, select the key you generated for the instance.
Select LXDE for Session and click OK.
When you are done, your session configuration should look similar to the following:
Note: If X2Go does not work on your computer, you can add the -X flag to the ssh command to enable X11 port forwarding (i.e., the ssh command would be ssh -X -i /path/to/pem/file ubuntu@<Public Domain Name>). X11 port forwarding is very slow compared to X2Go, however, so it is recommended that you troubleshoot X2Go further before turning to this option.
To upload data to your newly-created AWS instance, you can run the following command on the computer containing your data:
scp -r -i /path/to/pem/key /path/to/data ubuntu@<Public Domain Name>:/path/to/server/directory
If you have configured persistent storage, you will want to ensure that /path/to/server/directory is pointing to the mount point for the persistent storage. If you followed the instructions above or the instructions in the Starcluster section below, the mount point should be /media/ebs.
Starcluster is suggested for more sophisticated C-PAC runs. Using Starcluster, you can parallelize your analyses by distributing subjects across multiple nodes in an HPC cluster. The following section describes how to install and configure Starcluster to work with C-PAC, dynamically add nodes to your cluster and leverage C-PAC’s grid functionality.
If you have pip installed, Starcluster can be installed via:
pip install starcluster
Note that if you are using a *nix-based OS and you are not using an environment such as Miniconda, you will need to run the above command with sudo.
If you do not have pip installed, see the Official Starcluster Installation Instructions for alternative installation methods.
The C-PAC Starcluster plug-ins configure the SGE environment that C-PAC uses and ensure that storage space is writable. From the terminal, download the C-PAC Starcluster plug-ins and install them by running the following commands:
cd /tmp
git clone https://github.com/FCP-INDI/CPAC_CLOUD
cd CPAC_CLOUD/sc_plugins
mv *.py ~/.starcluster/plugins
Now you will need to create a Starcluster configuration file so that Starcluster can use your keys and know which instance types you would like to use. To begin, type starcluster help and select option 2.
Fill in the AWS access keys from the CVS file that you created in the Creating AWS Access and Network Keys section:
[aws info]
AWS_ACCESS_KEY_ID = <Your Acces Key>
AWS_SECRET_ACCESS_KEY = <Your Secret Key>
You do not need to define the AWS_USER_ID field unless you want to create custom AMIs based off the C-PAC AMI. The public C-PAC AMI is available in us-east-1, so you should not change the value of AWS_REGION_NAME.
Point your key definition to the pem file you generated in the Creating AWS Access and Network Keys section:
[key cpac_key]
KEY_LOCATION=/path/to/pem/file
Find the image ID for the C-PAC AMI by logging into the AWS Console using your favorite web browser. Make sure that you are in the N. Virginia region. Navigate to the EC2 service click Images -> AMIs. Then click Owned by Me in the upper left corner and switch it to Public images. Search for ‘CPAC’. Select the version of C-PAC that you wish to use and look in the lower pane for the AMI ID field.
Add the following cluster definition to your configuration file:
[cluster cpac_cluster]
KEYNAME = cpac_key
PLUGINS = cpac_sge, mnt_config
CLUSTER_SIZE = 1
CLUSTER_SHELL = bash
NODE_IMAGE_ID = <Image ID>
MASTER_INSTANCE_TYPE = t2.medium
NODE_INSTANCE_TYPE = c3.8xlarge
You can customize this to have additional nodes or use different instance types as per your needs. Note that you can always add nodes later using Starcluster from the command line. If you wish to use spot instances rather than on-demand instances, then add the following line to the cluster definition:
SPOT = <bidding_price>
Also add the following two plug-in definitions for the C-PAC Starcluster plug-ins:
[plugin cpac_sge]
setup_class = cpac_sge.PEInstaller
pe_url = https://raw.githubusercontent.com/FCP-INDI/CPAC_CLOUD/master/mpi_smp.conf

[plugin mnt_config]
setup_class = mnt_perm.MntPermissions
By default, the cluster will have an EBS-backed root volume and, if available, an instance store volume mounted at /mnt. Neither of these volumes are persistent and they will be destroyed when the cluster terminates. A shared directory mounted at /home on the head node can be used across nodes. If you need more storage than what is available on the head node or if you want to keep your data after the cluster is terminated, you will need to create a new volume that can be attached to all nodes in the cluster. To do so, begin by creating an EBS-backed volume:
starcluster createvolume --shutdown-volume-host <volume_size_in_gigabytes> <region> -I t2.micro -i <Image ID>
Type starcluster listvolumes and get the volume-id for the volume that you just created. Open up your Starcluster configuration file and add the following volume definition:
[volume cpac_volume]
VOLUME_ID = <Volume ID>
MOUNT_PATH = /media/ebs
Append the following line to your cpac_cluster definition:
VOLUMES = cpac_volume
The Starcluster documentation explains how to perform other operations such as resizing and removing volumes.
To start up the head node on your C-PAC HPC cluster, use the following Starcluster command (with substitutions where necessary):
starcluster start -c cpac_cluster <cluster_name>
To add additional nodes to your C-PAC HPC cluster, use the following Starcluster command (with substitutions where necessary):
starcluster addnode -n <number_of_nodes_to_add> <cluster_name>
If you wish to access the head node, type the following command:
starcluster sshmaster -X -u ubuntu <cluster_name>
If you only wish to access the command line interface, you may omit the -X flag:
starcluster sshmaster -u ubuntu <cluster_name>
You may also use the instructions for X2Go from the Starting a Single C-PAC Instance via the AWS Console section to access the head node via a graphical shell. To do so, obtain the public DNS for the head node by typing starcluster listclusters. The public DNS will be in the last column of the row labeled master.
C-PAC performs the heavy lifting of creating an SGE job submission script and submitting it to the SGE job scheduler seamlessly.
Via the shell:
Open your pipeline configuration YAML file in your preferred text editor.
Change the
runOnGridfield to a value ofTrue.Make sure that the
resourceManagerfield is set toSGE.Set the
parallelEnvironmentfield tompi_smp.Execute the following command to run your pipeline.
cpac_run.py /path/to/pipeline_config.yml /path/to/CPAC_subject_list.yml
Once you are done submitting the job, you can check its status by typing qstat. This command will produce output that looks similar to the following:
job-ID  prior   name       user         state submit/start at     queue                          slots ja-task-ID
-----------------------------------------------------------------------------------------------------------------
      1 0.55500 submit_201 ubuntu       r     06/05/2015 20:42:13 all.q@master                       1 1
      1 0.55500 submit_201 ubuntu       r     06/05/2015 20:42:13 all.q@node001                      1 2
      2 0.55500 submit_201 ubuntu       r     06/05/2015 20:42:58 all.q@node002                      1 1
      2 0.00000 submit_201 ubuntu       qw    06/05/2015 20:42:47                                    1 2
The job-ID is a number assigned to your job when it is submitted to the scheduler. The state of the job can be represented by one of several values: r means that the job is running, qw means that the job is queued and waiting, and E means that an error has occurred. The queue column indicates on which nodes of your cluster the C-PAC job is being executed.
If an error has occurred on any of the nodes while your pipeline executes, you should check the cluster_temp_files directory that was created in the directory from which you ran C-PAC. This will contain copies of the job submission scripts that C-PAC generated to start your job. It will also contain files containing the standard out and error messages for a given job. You should check these first to determine what may have caused the error. If these files do not help you determine what may have caused the error, feel free to ask for help on the C-PAC forum.
When you are done and have exited from your cluster, the following command will terminate the cluster:
starcluster terminate <cluster_name>
If you receive an error from Starcluster while trying to terminate the instance, the following command will force Starcluster to terminate your cluster:
starcluster terminate -f <cluster_name>
Warning: If you are not using persistent storage (see Attaching Persistent Storage to Your Cluster) then all of your data will be lost upon termination of the cluster. You will need to copy your data to another drive if you wish to keep it.
With OpenNeuro
The OpenNeuro project is an initiative to provide easy access to public neuroimaging datasets and the ability to quickly run analysis pipelines on these datasets directly through a web interface. C-PAC is available as an app on OpenNeuro, and more information on running apps on the platform is available here.