Appendix
Installing C-PAC
Before You Start
WAIT! Installing C-PAC is not required, and is an option for those who want to maintain their own installation, often on a server or cluster. For a faster way to get started:
C-PAC can be run without installing through any of these three options:
With a Docker or Singularity container (optionally with a simple Python commandline interface)
On the Amazon AWS Cloud
Through OpenNeuro
For more details, skip ahead to the C-PAC Quickstart or Run C-PAC pages.
Requirements
System Requirements
C-PAC is designed to run in a *nix-like environment and thus does not support Windows. The C-PAC team actively tests C-PAC in Ubuntu Linux, although older versions of that distribution and other *nixes (such as Mac OS X) should work as well. As a general rule, C-PAC can operate on any machine capable of reliably running AFNI and FSL.
Hardware Requirements
A multiprocessor/multicore system (highly recommended)
8 GB of RAM (for computationally-intensive processes such as anatomical registration using ANTS)
5.7 GB of free hard disk space (8.3 GB with ANTs)
A Note About the *nix Command Line
This user guide assumes a basic level of experience using the command line. If you are new to the command line (also known as the terminal), the resources below will help you get started:
Overview
If you are using Ubuntu (version 12/14) you can download and run cpac_install.sh with the following terminal commands as root:
wget https://github.com/FCP-INDI/C-PAC/blob/main/cpac_install.sh?raw=true
mv cpac_install.sh?raw=true cpac_install.sh
chmod +x cpac_install.sh
sudo ./cpac_install.sh -r
This will install all of the prerequisites and resources listed below. If you have previously installed versions of these, they will not be reinstalled, and the script will not check the release version to match the requirements of C-PAC.
Note
This script is intended for Ubuntu Linux 12/14, but it may work for older releases of Ubuntu.
For other operating systems, this page will guide you through the following C-PAC installation steps:
Installing the required system-level dependencies
Installing the required Python dependencies
Installing AFNI and FSL
Installing C3D and ANTS (optional, but recommended)
Installing the required C-PAC image resources
Installing C-PAC itself
It will also provide information on how to:
Test your installation.
Upgrade C-PAC to a new version.
Run C-PAC without installing.
Instructions
Installing System-Level Dependencies
A complete installation of C-PAC requires that the following dependencies be installed on your OS (and possibly other packages depending on your configuration):
cmake
make
build
git
unzip
libxp
netpbm
gcc (with Fortran and C++ compilers and libgfortran)
The Python developer libraries
lapack and its developer libraries
libcanberra (under Linux)
The Mesa OpenGL utility library
gsl
zlib and its developer libraries
Graphviz (optional; required for workflow graphs)
Xvfb
libxml
libxslt
Python developer libraries
The command to install all of these on Ubuntu 12/14 is:
sudo apt-get install -y cmake git make unzip libcanberra-gtk-module libxp6 netpbm libglu1-mesa gsl-bin zlib1g-dev graphviz graphviz-dev pkg-config build-essential libxml2-dev libxslt-dev python-dev xvfb
OS-Specific Instructions
Mac OS X:
Installing system-level and Python dependencies will be made much easier if you download the Xcode Command Line Tools from Apple (requires a free Apple account), which includes (among other things) Git and gcc.
You may want to consider using a package manager such as Homebrew, Macports, or Fink.
Ubuntu 16.04:
The apt-get command used for Ubuntu 12/14 works with libxp6 omitted. Unfortunately, libxp is no longer included in the Ubuntu repositories and will need to be compiled from source. The commands to accomplish this are as follows (note that these commands must be executed as the root user).
apt-get install autoconf autogen xutils-dev x11proto-print-dev
cd /tmp
git clone https://anongit.freedesktop.org/git/xorg/lib/libXp.git
cd libXp
./autogen.sh
configure
make
make install
Installing Python Dependencies
Please ensure that you are using Python 3.6 and above. Though many computers come with Python pre-installed, C-PAC relies on a number of special-purpose packages, which are listed below. Packages with an asterisk can be installed through easy_install or pip. Installing Anaconda (64-bit version only), Miniconda or Enthought Canopy and using a package manager can simplify installation greatly. Instructions for Miniconda are given below.
Note
cpac (the simple Python commandline interface) and a local installation of C-PAC will conflict if installed in the same environment because both use the same commandline command (cpac).
Note
Specific maximum versions are required for the following dependencies. C-PAC is currently (temporarily) not compatible with versions past the following:
These specific versions can be installed via pip:
pip install \
    boto3 \
    ciftify @ git+https://git@github.com/fcp-indi/ciftify#egg=ciftify \
    click \
    click-aliases \
    configparser \
    cython \
    flowdump==0.1.2 \
    future \
    INDI-Tools @ git+https://git@github.com/FCP-INDI/INDI-Tools.git#egg=INDI-Tools \
    lockfile \
    joblib \
    matplotlib \
    networkx \
    nibabel \
    nilearn \
    nipype \
    nose \
    numpy \
    pandas \
    pathvalidate \
    patsy \
    prov \
    psutil \
    PyBASC \
    pybids \
    pygraphviz \
    PyPEER @ git+https://git@github.com/ChildMindInstitute/PyPEER.git@6965d2b2bea0fef824e885fec33a8e0e6bd50a97#egg=PyPEER \
    python-dateutil \
    pyyaml \
    scikit-learn \
    scipy \
    sdcflows \
    semver \
    traits \
    voluptuous>=0.12.0 \
    xvfbwrapper \
The rest of the dependencies are as follows:
Cython (version 12.1 or greater)
iPython (optional)
PyGraphviz (optional; required for workflow graphs)
Miniconda
The following commands will install all the Python dependencies within a Miniconda environment:
wget http://repo.continuum.io/miniconda/Miniconda-3.8.3-Linux-x86_64.sh
chmod +x Miniconda-3.8.3-Linux-x86_64.sh
./Miniconda-3.8.3-Linux-x86_64.sh -b
export PATH=~/miniconda/bin:${PATH}
echo 'export PATH=~/miniconda/bin:${PATH}' >> ~/.bashrc
conda create -y -n cpac python
source activate cpac
conda install -y cython numpy scipy matplotlib networkx==1.11 traits pyyaml jinja2==2.7.2 nose ipython pip wxpython pandas
pip install lockfile pygraphviz nibabel nipype==1.1.2 patsy psutil boto3 INDI-Tools future==0.15.2 prov simplejson fs==0.5.4
source deactivate
OS-Specific Instructions
Mac OS X:
It is recommended that you use either Canopy or Anaconda/Miniconda to install Python packages such as wxPython, SciPy and NumPy. Manually installing these packages on OS X can be difficult and error-prone. If you use Anaconda/Conda, the commands above should install all packages seamlessly (assuming you download the Mac OS X Miniconda install script instead of the Linux script when using wget).
Installing AFNI and FSL
C-PAC harnesses the power of two leading neuroimaging software packages (AFNI and FSL) to perform key analyses. These packages must be installed before running C-PAC.
To install AFNI on a non-Fedora 21 64-bit Linux machine you may run the follow commands as the super user:
cd /tmp
wget http://afni.nimh.nih.gov/pub/dist/tgz/linux_openmp_64.tgz
tar xfz linux_openmp_64.tgz
mv linux_openmp_64 /opt/afni
For AFNI to be available globally on your machine, you should then add the following lines to the file located at /etc/bash.bashrc:
export PATH=/opt/afni:$PATH
export DYLD_FALLBACK_LIBRARY_PATH=/opt/afni
If you open a new shell and type afni the AFNI console should now appear. If not, double-check the lines added to /etc/bash.bashrc for typos and make sure that /opt/afni contains the AFNI commands.
Note
Regarding the Neurodebian repository: We have encountered compatibility issues in the past with the Neurodebian binary for AFNI. For this reason, it is suggested that you follow the installation instructions above or the instructions from the AFNI homepage.
Note
On some Ubuntu systems, AFNI can have trouble locating the libgsl.so.0 software library required for some of their tools (3dSkullStrip, and 3dHist). If you experience an error trying to run any of these tools, first attempt to re-install AFNI via the instructions on the AFNI homepage. If this does not resolve the issue, another solution involves locating your system’s GSL library and re-configuring:
locate libgsl
ldconfig -n /path/to/libgsl
For more details about installing AFNI (including instructions for other architectures) please refer to the AFNI manual here.
To install FSL on a Debian or Ubuntu-based Linux machine you may run the follow commands as the super user to install the Neurodebian repository, which contains a pre-packaged version of FSL that integrates seamlessly with the Debian ecosystem:
wget -O- http://neuro.debian.net/lists/$(lsb_release -cs).us-nh.full | tee /etc/apt/sources.list.d/neurodebian.sources.list
apt-key adv --recv-keys --keyserver pgp.mit.edu 2649A5A9
apt-get update
Now install FSL using:
apt-get install -y fsl-5.0-complete
For FSL to be available globally on your machine, you should then add the following lines to the file located at /etc/bash.bashrc:
FSLDIR=/usr/share/fsl/5.0
. ${FSLDIR}/etc/fslconf/fsl.sh
PATH=${FSLDIR}/bin:${PATH}
export FSLDIR PATH
For more details about installing FSL (including instructions for other architectures) please refer to the FSL documentation here.
OS-Specific Instructions
Mac OS X:
In Mac OS X, you can make it so that a local user account can find AFNI by adding the lines in the instructions above to the
.bashrcfile in your home directory and then adding the following code to the.bash_profilefile in your home directory.if [ -f ~/.bashrc ]; then source ~/.bashrc fi
Installing C3D and ANTS (optional, but recommended)
ANTS is an optional, but recommended package for performing image registration / normalization. ANTS depends upon C3D, which can be installed by following the steps below. If you do not want to install ANTS, you may skip this step. You can always install ANTS later.
Installing C3D
Unzip the downloaded archive, and place the extracted folder in the location of your choosing.
Add the following text to your
.bashrcfile:
export PATH=/path_to/C3D/bin:$PATH
Where /path_to/C3D is the location of the extracted folder.
Open a new terminal window. Test your installation by running
c3d_affine_tool. If this fails, see the Troubleshooting section below.
Troubleshooting:
If you are given a permissions error, run
chmod -R /path_to/X, where X is the folder of the package giving you the error.If you have added the paths to your
.bashrc(and.bash_profileif necessary) but you are still unable to run the commands above, try adding or removing a trailing / from the paths (e.g.../binvs.../bin/). We are working to compile a list of which platforms require the slash and which do not.
Installing ANTS
To install ANTS, follow the instructions below.
For Debian-based platforms, install the Neurodebian keys (see the FSL installation instructions above) and run the following command as the super user:
apt-get install ants
For other platforms, download ANTS from Github and compile from source:
cd /tmp
git clone https://github.com/stnava/ANTs.git
This will create a folder named “ANTS” in the directory where you ran the command from.
Next, create a new directory in a location of your choosing and navigate to it:
mkdir /opt/ants
cd /opt/ants
Next, run these commands from this directory to build your ANTS install:
cmake -c -g /tmp/ANTS
make -j <number>
Where <number> is how many cores you wish to dedicate to building your install - the more you use, the sooner it will complete. For example, if you want to use four cores, you would run ‘make -j 4’.
Once this is complete, you will need to modify your environment. Add the following text to your .bashrc file:
export ANTSPATH=/opt/ants/bin
export PATH=/opt/ants/bin:$PATH
You can test the installation by opening a new terminal window and running this command:
antsApplyTransforms
If this returns a help page with a list of parameters, your ANTS installation was a success.
OS-Specific Instructions
Mac OS X:
Similar to the AFNI and FSL path setup, you must also add the C3D and ANTS paths to your
.bash_profilefile.
Installing ICA-AROMA
If you wish to run ICA-AROMA motion artifact de-noising (implemented by Maarten Mennes: https://github.com/maartenmennes/ICA-AROMA), you need to install the script first:
mkdir -p /opt/ICA-AROMA
curl -sSL "https://github.com/rhr-pruim/ICA-AROMA/archive/v0.4.3-beta.tar.gz" \
    | tar -xzC /opt/ICA-AROMA --strip-components 1
chmod +x /opt/ICA-AROMA/ICA_AROMA.py
Once this is complete, you will need to modify your environment. Add the following text to your .bashrc or .bash_profile (if on Mac OS) file:
export PATH=/opt/ICA-AROMA/ICA_AROMA.py:$PATH
Installing C-PAC Image Resources
During preprocessing and analysis, C-PAC utilizes many of the standard brain atlases and tissue maps provided by FSL. Additionally, C-PAC requires the following non-standard files in order to run properly:
Binarized tissue prior probability maps (used during tissue segmentation)
Symmetric versions of the MNI152 brain template and masks (used when calculating VMHC)
These files are included in the C-PAC Image Resources package, available here. You may install these files using the following commands or use the included script (install_resources.sh):
cd /tmp
wget http://fcon_1000.projects.nitrc.org/indi/cpac_resources.tar.gz
tar xfz cpac_resources.tar.gz
cd cpac_image_resources
cp -n MNI_3mm/* $FSLDIR/data/standard
cp -n MNI_4mm/* $FSLDIR/data/standard
cp -n symmetric/* $FSLDIR/data/standard
cp -nr tissuepriors/2mm $FSLDIR/data/standard/tissuepriors
cp -nr tissuepriors/3mm $FSLDIR/data/standard/tissuepriors
cp -nr tissuepriors/4mm $FSLDIR/data/standard/tissuepriors
cp -n HarvardOxford-lateral-ventricles-thr25-2mm.nii.gz $FSLDIR/data/atlases/HarvardOxford
These commands perform the following steps:
The image resources are downloaded.
3mm and 4mm MNI tempaltes are copied to the
/data/standarddirectory of your FSL installation.Files located in the
/symmetricfolder of the C-PAC Image Resources directory are copied to the/data/standarddirectory of your FSL installation.The
/2mmand/3mmfolders located in C-PAC Image Resources directory are copied to/data/standard/tissuepriorsdirectory of your FSL installation.
Installing C-PAC
Congratulations, you are now ready to install C-PAC itself!
C-PAC is available for download from the C-PAC Homepage. Click the button labeled “Download as tar.gz”. Unpack the downloaded archive and navigate to the new directory. To install C-PAC, run the command sudo python setup.py install. C-PAC will be installed alongside your other python packages. If this fails, check to make sure that you have all the dependencies installed. You may also install C-PAC using the commands below:
cd /tmp
git clone https://github.com/FCP-INDI/C-PAC.git
cd C-PAC
python setup.py install
Testing Your C-PAC Installation
In a new terminal window, open iPython (or Python) and enter the command import CPAC. If installation was successful, this will execute without an error and present you with a blank new line. If you encounter an error (e.g. no module named C-PAC), try re-running the C-PAC install command above. If this does not work, see the Troubleshooting and Help Page. Note that if you do not open a new terminal window and are still within the C-PAC installation directory (‘C-PAC’), you may encounter errors that can be alleviated by leaving the ‘C-PAC’ directory.
Once you are able to successfully import CPAC it is safe to delete any setup files downloaded during the install process (e.g. Nipype and C-PAC downloads, FSL install scripts, etc.), as they are no longer needed.
Note
The test process described here only acts to confirm that the C-PAC python package (the core package, not the simple Python commandline interface with the same name) has been correctly installed. To fully test C-PAC on your system, please see the Benchmark Page.
Updating C-PAC
C-PAC is being actively developed, and new versions (containing bug fixes and new features) are often released. To update to the latest version, simply download it from the C-PAC Homepage and repeat the instructions in the Installing C-PAC section above. A list of previous versions and the changes they contain is available on the Release Notes Page.
Note
If you are using Anaconda/Miniconda you may also use the following command (replacing ‘cpac’ with your environment name) to remove an old environment before creating a new environment to replace it.**
conda remove --all -n cpac
Running C-PAC Without Installing
Users wishing to run C-PAC without installing it can do so by copying the downloaded C-PAC directory to the location of their choice. C-PAC can then be run by opening iPython (or Python) from within this directory. This is useful in cases where a user does not have sufficient privileges to install Python packages, but is running on a machine that already contains all C-PAC dependencies.
Some network centrality features will not be available without compiling the C-based elements. In order to do this without installing the rest of C-PAC, simply use the following command
python setup.py build_ext --inplace
Benchmark Package
The C-PAC benchmark package consists of all of the configuration files and scripts needed to test C-PAC on your machine and compare your outputs with a standard set of outputs processed by the C-PAC team. Specifically, it contains:
A shell script to automatically configure the paths within all of the settings files (
adjustSettingPaths.sh).A pipeline configuration file using ANTS (
pipeline_config_benchmark.yml).A data configuration (
CPAC_benchmark_participants.yml).Masks, and ROIs for timeseries extraction, centrality, dual regression, etc.
A Python script to compare your outputs with ours (
correlations_workflow_pipeline.py).
The benchmark package can be downloaded here. The following instructions will guide you through the process of running the C-PAC benchmark.
Prerequisites
Before running the benchmark, make sure that your computer has at least 56 GB of RAM. The benchmark pipeline configuration runs 4 participants at a time with 12 GB allocated for each participant, so 56 GB will give you enough RAM to accommodate these participants plus some extra RAM for any other applications that are running. If you do not have 56 GB of RAM, you can modify the benchmark pipeline configuration to run fewer participants at a time- just ensure that you have around 14 GB available for each participant.
Also ensure that you have at least 720 GB of free space on the volume you’re running the benchmark on. This will allow you to keep a working directory (which is chronically emptied as participants are run and should not exceed 55 GB) and two copies of the outputs (one 333 GB copy of our team’s pre-computed outputs, and another 333 GB for the outputs generated by your server or workstation).
Downloading the Precomputed C-PAC Outputs from the FCP-INDI S3 Bucket
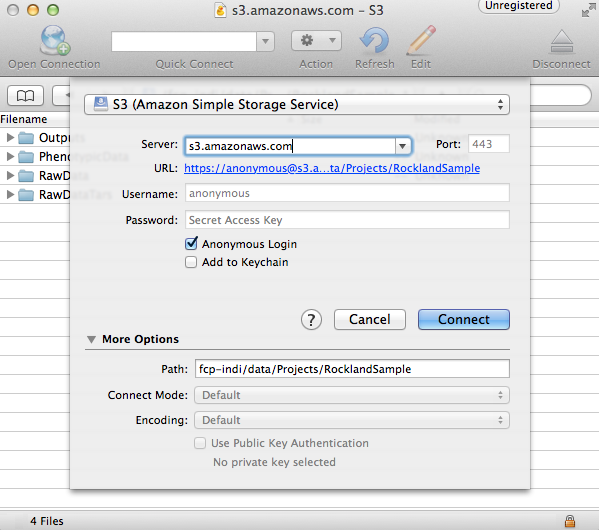
The C-PAC precomputed outputs are stored in Amazon Web Service’s Simple Storage Service (S3). They can be accessed using Cyberduck, a file transfer programs for Mac OS X and Windows that handles S3 natively and allow you to navigate through the data using a file browser. For individuals who are more comfortable with the terminal, Cyberduck also has a command line version that works with Windows, Mac OS X, and Linux. There is also an official AWS command line tool that can also be used. Instructions for using the grpahical version of Cyberduck are as follows:
Open Cyberduck and click on Open Connection.
Set the application protocol in the dropdown menu to S3 (Amazon Simple Storage Service).
Set the server to s3.amazonaws.com.
Check the box labelled Anonymous Login.
Expand the More Options tab and set Path to fcp-indi/resources/cpac_benchmark.
Click Connect.
The end result should appear similar to the following:
The pre-computed outputs are separated by version number within the directory that will now appear so that you can download the outputs for the version that you are testing out.
Configuring C-PAC
First, extract the package using the command tar xzvf benchmark_package.tar.gz. Then, navigate to benchmark_package/scripts in the terminal and execute ./adjustSettingPaths.sh. This will ensure that the paths used in the configuration files are in accord with whichever directory you choose to store benchmark_package in. This script assumes that it lives in the /scripts directory. If it has been moved elsewhere, it may be executed using ./adjustSettingPaths.sh <path to benchmark_package directory>
Next, load in the data configuration. This contains paths to images that are publicly downloadable from Amazon Webs Services S3. Open the C-PAC GUI and click Load next to the subject pane. Select CPAC_benchmark_participants.yml.
Finally, load in the pipeline configuration. In the main C-PAC window, under Pipelines, click Load and select the pipeline_config_benchmark.yml file located in /settings/configs in the benchmark directory. A new pipeline will show up in the list window. Select this pipeline and click Edit to inspect it.
Running An Individual-Level Analysis
Once you have configured C-PAC by loading in the pipeline configuration YAML and data configuration, you may run the individual-level analysis pipeline by clicking the appropriate button at the bottom of the main C-PAC window. This will bring up a log window that displays the progress of the C-PAC run.
Comparing Outputs
Navigate to the benchmark_packages/scripts directory within the benchmark package. Here you will find a script named correlations_workflow_pipeline.py, which can help you compare your outputs and the reference outputs from the C-PAC team.
This will produce Pearson’s r and a concordance correlation coefficient between two sets of output for the following measures:
ALFF and f/ALFF
Centrality
Dual Regression
ReHo
VMHC
To run this script, type python correlations_workflow_pipeline.py <path to output1 pipeline> <path to output2 pipeline> <number of cores to use> <descriptive name>. Make sure that the paths you use point to the pipeline directories within the output directories. To determine the maximum number of cores on your machine, type nproc in a terminal window.
When this script is done, it will produce plots for the correlation measures, stored in the directories ‘MNI_outputs’, ‘MNI_SCA’, ‘native_outputs’, ‘natived_SCA’, ‘nonscrub_vs_scrub’, and ‘registration’. It also produces Python pickle files containing dictionaries with measures as keys and Pearson or concordance correlations as values. Python pickles can be thought of as similar to .mat files in MATLAB- they allow you to save variables in the workspace to an external file on the hard drive.