Benchmark Package
The C-PAC benchmark package consists of all of the configuration files and scripts needed to test C-PAC on your machine and compare your outputs with a standard set of outputs processed by the C-PAC team. Specifically, it contains:
A shell script to automatically configure the paths within all of the settings files (
adjustSettingPaths.sh).A pipeline configuration file using ANTS (
pipeline_config_benchmark.yml).A data configuration (
CPAC_benchmark_participants.yml).Masks, and ROIs for timeseries extraction, centrality, dual regression, etc.
A Python script to compare your outputs with ours (
correlations_workflow_pipeline.py).
The benchmark package can be downloaded here. The following instructions will guide you through the process of running the C-PAC benchmark.
Prerequisites
Before running the benchmark, make sure that your computer has at least 56 GB of RAM. The benchmark pipeline configuration runs 4 participants at a time with 12 GB allocated for each participant, so 56 GB will give you enough RAM to accommodate these participants plus some extra RAM for any other applications that are running. If you do not have 56 GB of RAM, you can modify the benchmark pipeline configuration to run fewer participants at a time- just ensure that you have around 14 GB available for each participant.
Also ensure that you have at least 720 GB of free space on the volume you’re running the benchmark on. This will allow you to keep a working directory (which is chronically emptied as participants are run and should not exceed 55 GB) and two copies of the outputs (one 333 GB copy of our team’s pre-computed outputs, and another 333 GB for the outputs generated by your server or workstation).
Downloading the Precomputed C-PAC Outputs from the FCP-INDI S3 Bucket
The C-PAC precomputed outputs are stored in Amazon Web Service’s Simple Storage Service (S3). They can be accessed using Cyberduck, a file transfer programs for Mac OS X and Windows that handles S3 natively and allow you to navigate through the data using a file browser. For individuals who are more comfortable with the terminal, Cyberduck also has a command line version that works with Windows, Mac OS X, and Linux. There is also an official AWS command line tool that can also be used. Instructions for using the grpahical version of Cyberduck are as follows:
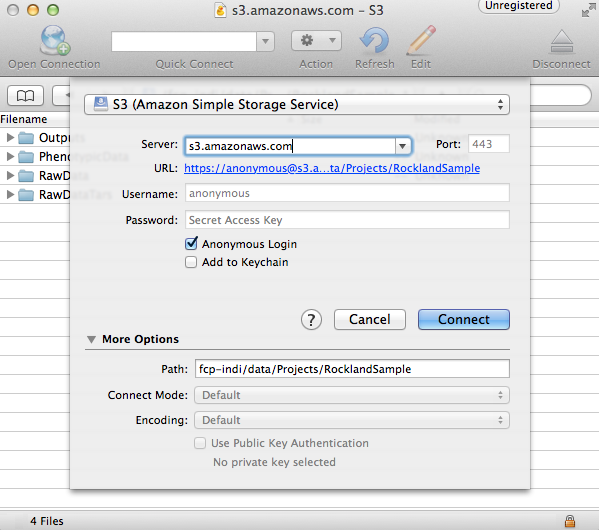
Open Cyberduck and click on Open Connection.
Set the application protocol in the dropdown menu to S3 (Amazon Simple Storage Service).
Set the server to s3.amazonaws.com.
Check the box labelled Anonymous Login.
Expand the More Options tab and set Path to fcp-indi/resources/cpac_benchmark.
Click Connect.
The end result should appear similar to the following:
The pre-computed outputs are separated by version number within the directory that will now appear so that you can download the outputs for the version that you are testing out.
Configuring C-PAC
First, extract the package using the command tar xzvf benchmark_package.tar.gz. Then, navigate to benchmark_package/scripts in the terminal and execute ./adjustSettingPaths.sh. This will ensure that the paths used in the configuration files are in accord with whichever directory you choose to store benchmark_package in. This script assumes that it lives in the /scripts directory. If it has been moved elsewhere, it may be executed using ./adjustSettingPaths.sh <path to benchmark_package directory>
Next, load in the data configuration. This contains paths to images that are publicly downloadable from Amazon Webs Services S3. Open the C-PAC GUI and click Load next to the subject pane. Select CPAC_benchmark_participants.yml.
Finally, load in the pipeline configuration. In the main C-PAC window, under Pipelines, click Load and select the pipeline_config_benchmark.yml file located in /settings/configs in the benchmark directory. A new pipeline will show up in the list window. Select this pipeline and click Edit to inspect it.
Running An Individual-Level Analysis
Once you have configured C-PAC by loading in the pipeline configuration YAML and data configuration, you may run the individual-level analysis pipeline by clicking the appropriate button at the bottom of the main C-PAC window. This will bring up a log window that displays the progress of the C-PAC run.
Comparing Outputs
Navigate to the benchmark_packages/scripts directory within the benchmark package. Here you will find a script named correlations_workflow_pipeline.py, which can help you compare your outputs and the reference outputs from the C-PAC team.
This will produce Pearson’s r and a concordance correlation coefficient between two sets of output for the following measures:
ALFF and f/ALFF
Centrality
Dual Regression
ReHo
VMHC
To run this script, type python correlations_workflow_pipeline.py <path to output1 pipeline> <path to output2 pipeline> <number of cores to use> <descriptive name>. Make sure that the paths you use point to the pipeline directories within the output directories. To determine the maximum number of cores on your machine, type nproc in a terminal window.
When this script is done, it will produce plots for the correlation measures, stored in the directories ‘MNI_outputs’, ‘MNI_SCA’, ‘native_outputs’, ‘natived_SCA’, ‘nonscrub_vs_scrub’, and ‘registration’. It also produces Python pickle files containing dictionaries with measures as keys and Pearson or concordance correlations as values. Python pickles can be thought of as similar to .mat files in MATLAB- they allow you to save variables in the workspace to an external file on the hard drive.